

失望
shian | 21 三月, 2004 00:44
經過昨天的選舉,真替台灣感到傷心難過,台灣為何要如此悲情呢!
為何會有如此二級化的對立與衝突呢?
台灣未來真正的希望在哪?
我們的下一代天真的小朋友們,他們的天空還等待著讓他們自由地揮灑發揮呢!
我們沒有權力留下一個混亂失序的國家社會,讓他們承擔苦果.......
Posted in 隨想手札 . 迴響: (0). 引用:(0). 靜態連結網址
DNS server 更新及設定
shian | 14 三月, 2004 22:29
學校最後一台擴大內需時的主機,終於升級完畢!
這一台舊server是負責DNS網域解析,主機的等級是P2 233, ram 256M,
更換成一台較新的主機P4 2.4G , ram 512M 作業系統 Fedora ,
至此全校的主機都全部更新完畢,至少可以撐個二、三年沒問題了!
在設定新主機的DNS時,一度出現狀況:DNS無法啟動,設定的方法也和舊的DNS版本不同,
新的DNS的設定目錄多了好幾層,弄了半天,才漸漸的有了頭緒,
原來新的DNS在系統安裝時,多安裝了一個套件:bind-chroot-9.2.2.P3-9
最後,嘗試移除bind-chroot-9.2.2.P3-9和DNS主套件bind-9.2.2.P3-9後再重新安裝bind-9.2.2.P3-9,再將DNS所有的設定檔放回正確的目錄之中,重新啟動DNS,總算是可以順利運作了!
[root@ms1 root]# rpm -qa | grep bind
bind-9.2.2.P3-9
ypbind-1.12-3
bind-utils-9.2.2.P3-9
bind-chroot-9.2.2.P3-9
[root@ms1 root]# rpm -e bind-chroot-9.2.2.P3-9
[root@ms1 root]# rpm -e bind-9.2.2.P3-9
[root@ms1 root]# rpm -Uvh bind-9.2.2.P3-9.i386.rpm
如果要使用Webmin來設定DNS,要注意先到
<組態設定>
Chroot 路徑以執行 BIND => Default
Is named.conf under chroot directory? => No
......................................................................................
ms5 server 移除Bind套件步驟:
[root@ms5 root]# rpm -qa | grep bind
bind-utils-9.2.1-16
ypbind-1.11-4
bind-9.2.1-16
redhat-config-bind-1.9.0-13
[root@ms5 root]# rpm -e bind-*
error: Failed dependencies:
bind is needed by (installed) redhat-config-bind-1.9.0-13
[root@ms5 root]# rpm -e redhat-config-bind-1.9.0-13
[root@ms5 root]# rpm -qa | grep bind
bind-utils-9.2.1-16
ypbind-1.11-4
bind-9.2.1-16
[root@ms5 root]# rpm -e bind-*
warning: /etc/rndc.key saved as /etc/rndc.key.rpmsave
[root@ms5 root]# rpm -qa | grep bind
bind-utils-9.2.1-16
ypbind-1.11-4
[root@ms5 root]# rpm -e bind-utils-9.2.1-16
[root@ms5 root]# rpm -qa | grep bind
ypbind-1.11-4
[root@ms5 root]#
Posted in 網管工作 . 迴響: (0). 引用:(0). 靜態連結網址
實作windows xp 加入samba網域二
shian | 02 三月, 2004 22:24
前二天將家裡的網路環境實作成功,今天開始拿學校的server測試。
學校Samba server 主機
Redhat 9 + samba 2.27
1.更改 smb.conf
[root@lin root]# vi /etc/samba/smb.conf
2.smb.conf 設定檔內容
#======================= Global Settings =====================================
[global]
# workgroup = NT-Domain-Name or Workgroup-Name
workgroup = ttes
//學校網域名稱
# server string is the equivalent of the NT Description field
server string = Samba Server
# This option is important for security. It allows you to restrict
# connections to machines which are on your local network. The
# following example restricts access to two C class networks and
# the "loopback" interface. For more examples of the syntax see
# the smb.conf man page
; hosts allow = 192.168.1. 192.168.2. 127.
hosts allow = 192.168.200. 163.22.69. 192.168.100.
// 准許學校網段內的IP可以連線
# if you want to automatically load your printer list rather
# than setting them up individually then you'll need this
printcap name = /etc/printcap
load printers = yes
# It should not be necessary to spell out the print system type unless
# yours is non-standard. Currently supported print systems include:
# bsd, sysv, plp, lprng, aix, hpux, qnx, cups
printing = cups
# Uncomment this if you want a guest account, you must add this to /etc/passwd
# otherwise the user "nobody" is used
; guest account = pcguest
# this tells Samba to use a separate log file for each machine
# that connects
log file = /var/log/samba/%m.log
# Put a capping on the size of the log files (in Kb).
max log size = 0
# Security mode. Most people will want user level security. See
# security_level.txt for details.
security = user
//安全等級 設定為user
# Use password server option only with security = server
# The argument list may include:
# password server = My_PDC_Name [My_BDC_Name] [My_Next_BDC_Name]
# or to auto-locate the domain controller/s
# password server = *
; password server =
# Password Level allows matching of _n_ characters of the password for
# all combinations of upper and lower case.
; password level = 8
; username level = 8
# You may wish to use password encryption. Please read
# ENCRYPTION.txt, Win95.txt and WinNT.txt in the Samba documentation.
# Do not enable this option unless you have read those documents
encrypt passwords = yes
//密碼加密
smb passwd file = /etc/samba/smbpasswd
//samba 密碼檔的路徑
# The following is needed to keep smbclient from spouting spurious errors
# when Samba is built with support for SSL.
; ssl CA certFile = /usr/share/ssl/certs/ca-bundle.crt
# The following are needed to allow password changing from Windows to
# update the Linux system password also.
# NOTE: Use these with 'encrypt passwords' and 'smb passwd file' above.
# NOTE2: You do NOT need these to allow workstations to change only
# the encrypted SMB passwords. They allow the Unix password
# to be kept in sync with the SMB password.
unix password sync = Yes
passwd program = /usr/bin/passwd %u
passwd chat = *New*password* %nn *Retype*new*password* %nn *passwd:*all*authentication*tokens*updated*successfully*
# You can use PAM's password change control flag for Samba. If
# enabled, then PAM will be used for password changes when requested
# by an SMB client instead of the program listed in passwd program.
# It should be possible to enable this without changing your passwd
# chat parameter for most setups.
pam password change = yes
# Unix users can map to different SMB User names
; username map = /etc/samba/smbusers
# Using the following line enables you to customise your configuration
# on a per machine basis. The %m gets replaced with the netbios name
# of the machine that is connecting
; include = /etc/samba/smb.conf.%m
# This parameter will control whether or not Samba should obey PAM's
# account and session management directives. The default behavior is
# to use PAM for clear text authentication only and to ignore any
# account or session management. Note that Samba always ignores PAM
# for authentication in the case of encrypt passwords = yes
obey pam restrictions = yes
# Most people will find that this option gives better performance.
# See speed.txt and the manual pages for details
socket options = TCP_NODELAY SO_RCVBUF=8192 SO_SNDBUF=8192
# Configure Samba to use multiple interfaces
# If you have multiple network interfaces then you must list them
# here. See the man page for details.
; interfaces = 192.168.12.2/24 192.168.13.2/24
interfaces = 192.168.200.2/255.255.255.0 163.22.69.131/255.255.255.128
//samba 主機 的網卡IP
# Configure remote browse list synchronisation here
# request announcement to, or browse list sync from:
# a specific host or from / to a whole subnet (see below)
; remote browse sync = 192.168.3.25 192.168.5.255
# Cause this host to announce itself to local subnets here
; remote announce = 192.168.1.255 192.168.2.44
# Browser Control Options:
# set local master to no if you don't want Samba to become a master
# browser on your network. Otherwise the normal election rules apply
; local master = no
# OS Level determines the precedence of this server in master browser
# elections. The default value should be reasonable
os level = 33
//若要 Samba當 PDC, os level 至少要 33,成為區域網路的 PDC。
# Domain Master specifies Samba to be the Domain Master Browser. This
# allows Samba to collate browse lists between subnets. Don't use this
# if you already have a Windows NT domain controller doing this job
domain master = yes
# Preferred Master causes Samba to force a local browser election on startup
# and gives it a slightly higher chance of winning the election
preferred master = yes
# Enable this if you want Samba to be a domain logon server for
# Windows95 workstations.
domain logons = yes
# if you enable domain logons then you may want a per-machine or
# per user logon script
# run a specific logon batch file per workstation (machine)
; logon script = %m.bat
# run a specific logon batch file per username
; logon script = %U.bat
# Where to store roving profiles (only for Win95 and WinNT)
# %L substitutes for this servers netbios name, %U is username
# You must uncomment the [Profiles] share below
; logon path = %LProfiles%U
logon path = %LProfiles%U
//設定Win95/98/NT/xp的個人環境參數檔路徑(個別化環境參數)。
// %L表示主機名稱, %U表示帳號名稱
logon drive = H:
// 設定登入帳號家目錄與xp對應的網路磁碟機代號。
logon home = ms2%u
//設定登入帳號家目錄(home directory)的路徑。
# Windows Internet Name Serving Support Section:
# WINS Support - Tells the NMBD component of Samba to enable it's WINS Server
; wins support = yes
# WINS Server - Tells the NMBD components of Samba to be a WINS Client
# Note: Samba can be either a WINS Server, or a WINS Client, but NOT both
; wins server = 163.22.69.131
# WINS Proxy - Tells Samba to answer name resolution queries on
# behalf of a non WINS capable client, for this to work there must be
# at least one WINS Server on the network. The default is NO.
; wins proxy = yes
# DNS Proxy - tells Samba whether or not to try to resolve NetBIOS names
# via DNS nslookups. The built-in default for versions 1.9.17 is yes,
# this has been changed in version 1.9.18 to no.
dns proxy = no
# Case Preservation can be handy - system default is _no_
# NOTE: These can be set on a per share basis
; preserve case = no
; short preserve case = no
# Default case is normally upper case for all DOS files
; default case = lower
# Be very careful with case sensitivity - it can break things!
; case sensitive = no
client code page = 950
// 支援中文顯示
#============================ Share Definitions ==============================
[homes]
comment = Home Directories
browseable = no
writable = yes
valid users = %S
create mode = 0664
directory mode = 0775
[Profiles]
comment = user profiles
path = /home/samba/profiles
writable = yes
browseable = no
create mask = 600
directory mask = 700
[public]
path = /home/public
public = yes
only guest = yes
writable = yes
printable = no
3.重新啟動samba
[root@lin root]# /etc/rc.d/init.d/smb restart
4.建立目錄資料夾profiles
[root@lin root]# mkdir -p /home/samba/profiles
[root@lin root]# chmod 1777 /home/samba/profiles
5.建立samba 管理者root帳號 密碼
[root@lin root]# smbpasswd -a root
6.建立機器帳號
[root@lin root]# /usr/sbin/useradd -g 100 -d /dev/null -c npc31 -m -s /bin/false npc31$
// npc31是要加入samba網域的那台電腦名稱
7.接下來才能在 Samba 上開機器帳號。
[root@lin root]# smbpasswd -a -m npc31$
8.Windows XP professional 修改程序
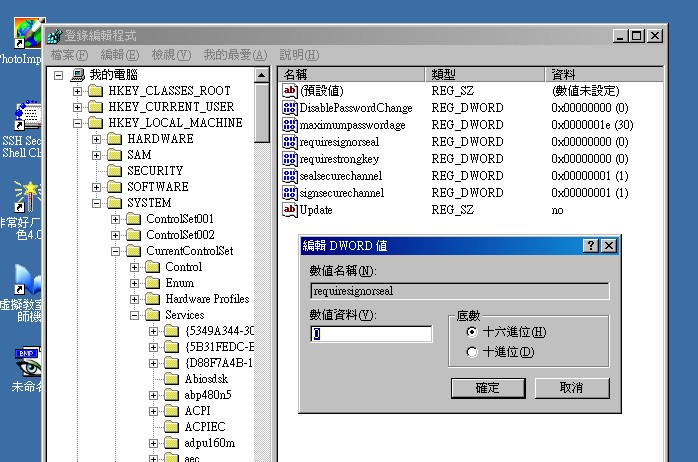
8.1. 修改登錄檔:執行 -> regedit,將下列機碼改為 0
HKEY_LOCAL_MACHINESYSTEMCurrentControlSetServicesnetlogonparameters
"RequireSignOrSeal"=dword:00000000
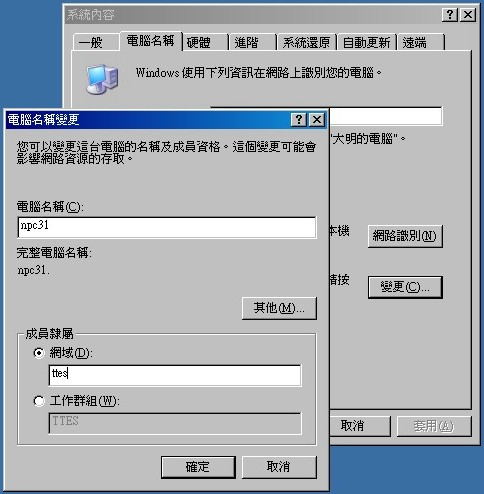
8.2 我的電腦 (按右鍵) -> 內容 -> 電腦名稱 -> 變更
==> 加入samba網域ttes。
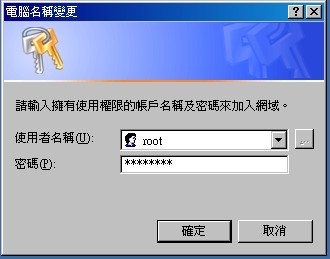
9.輸入samba主機管理者root 密碼 重新啟動。
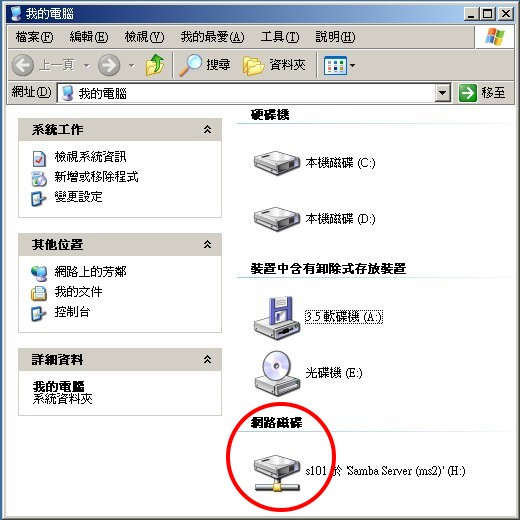
10.登入samba網域ttes,並且自動連線個人家目錄成為網路磁碟機。
參考資料:
Linux 與 Windows共舞 異質平台整合方案 旗標出版社
http://www.hmes.kh.edu.tw/~jona/redhat/samba/samba.htm
Posted in 網管工作 . 迴響: (2). 引用:(0). 靜態連結網址
NTOP網路監視 for Redhat 9.0
shian | 01 三月, 2004 22:22
NTOP網路監視
[by 狼主的網路實驗室] [部份資料參考自: ADJ網路實驗室]
NTOP 是一套監測區域網路內封包數量的軟體,它可以搭配 MRTG ,找出網路大量封包暴增之所在.
同時以圖形化顯示,讓統計結果簡單易讀.
測試環境:
Redhat 9.0
已安裝 mysql 及 gnu C 等套件
安裝步驟:
1.先下載 Source RPM 檔﹕
http://www.ntop.org
選擇適當的版本
2.開始進行解壓工作﹕
[root@test root]# rpm -ihv ntop-2.2-0.src.rpm
它解開後會放到 /usr/src/redhat/SOURCES/ntop-2.2 這個目錄
cd /usr/src/redhat/SOURCES/ntop-2.2
會看到兩個目錄
[root@test ntop-2.2]# ls
gdchart0.94c ntop
[root@test ntop-2.2]#
先compiler gdchart
[root@test ntop-2.2]# cd gdchart0.94c/
[root@test gdchart0.94c]# ./configure
.
.
Do not forget to build:
1. gd-1.8.3/libpng-1.2.4
2. zlib-1.1.4/
最後會看到提醒你要build libpng and zlib.......
再繼續下一步之前...必須先compiler 那兩樣...
先build libpng...
[root@test gdchart0.94c]# cd gd-1.8.3/libpng-1.2.4/
[root@test libpng-1.2.4]# cp scripts/makefile.linux Makefile
[root@test libpng-1.2.4]# make
再build zlib﹕
[root@test gdchart0.94c]# cd ../../zlib-1.1.4
[root@test zlib-1.1.4]# ./configure
[root@test zlib-1.1.4]# make
再來就可以compiler gdchart:
[root@test zlib-1.1.4]# cd ..
[root@test gdchart0.94c]# make
gdchart的部份到這邊告一段落...
接下來進行 ntop 的編譯 ...
3.Compile NTOP:
回到 ntop 目錄
[root@test gdchart0.94c]# cd ../ntop/
[root@test ntop]# ./configure
[root@test ntop]# make
這部份會花比較久的時間......接著再﹕
[root@test ntop]# make install
**重要:
編譯安裝完並未建立 /usr/local/var/ntop/
需先手動建立
[root@test ntop]# mkdir /usr/local/var/ntop/
到此完成, 接下來看看完成的畫面...
4.執行 NTOP:
執行方式如下:
[root@test ntop]# ntop -P /usr/local/var/ntop/ -u nobody
第一次執行它會要你輸入admin的password...它預設密碼也是admin...
第二次執行就不用再輸入..
這時你可以打開web browser..輸入:
http://:3000
你就會看到如下圖...代表已成功安裝 :
不過你會發現...執行上面指令會把terminal視窗佔住...
你可以先"ctrl+z"先 stop 住...再下" bg %1"(假設它在你的jobs裡數字是1)...
這樣就可以丟到背景執行...
或是重新執行下面指令:
[root@test ntop]# nohup ntop -P /usr/local/var/ntop/ -u nobody &
5.開機自動執行 NTOP:
[root@test ntop]# cd /etc/rc.d
編輯 rc.local
最後一行加入
nohup /usr/local/bin/ntop -P /usr/local/var/ntop/ -u nobody &
重新開機後即可自動啟動 NTOP